Picture this: you’re on your usual trek through the trails when your bike suddenly breaks down. Your phone battery is dead, and the nearest station is miles away. Sure, you have a basic tool kit attached to your bike, but you have no idea how to get your bike repaired. What are you going to do now? Don’t fret; there’s no need to call a professional. Basic bike repair and maintenance is one of the most natural things to learn and we are going to tell you how to handle bike repair and maintenance.
When you buy a bike, doing your bike repair and maintenance is part of the bargain. More than just practicality, learning do-it-yourself (D.I.Y.) bike repairs is all about safety. Studies show that an average of 3,792 bicycle accidents occur every year, 58% of which are caused by faulty parts or lack of basic bike maintenance.
Apart from saving time, you’re also cutting back on your expenses. A simple bicycle tune-up will cost you around $150 to $350, while the accessory installation is usually charged at approximately $50 each, and that’s on top of the price for every part replaced. This is why most bike enthusiasts will recommend doing your bike repairs.
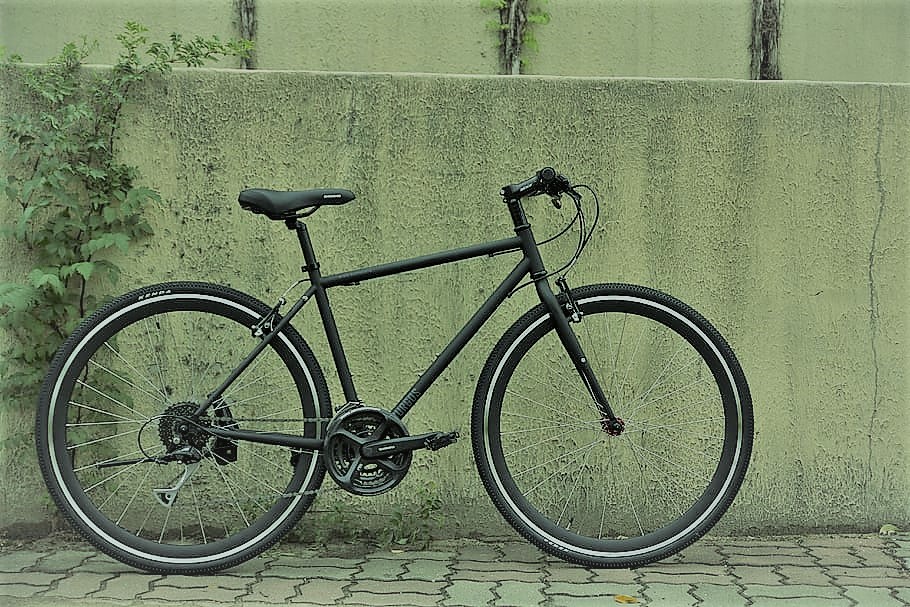
From changing a flat tire to repairing gear tension, all you need to know is doing your bike repair and maintenance. This procedure is very vital to any type of bike: road bike, mountain bike, or hybrid bike.
>>>Check out the review of best hybrid bikes for beginner
The Basics: Bicycle Parts and How They Function
The first step is to understand how your bike works. Like any other machine, you need to identify each part and its respective functions. Below are the parts, tools, bike mechanic, and all other details that go into repairing and maintaining your bicycles:
1Bicycle Frame
Often called the “heart of a bike,” the frame is the diamond-shaped body of a bike. The frame is the base of the bike – it provides attachments for all other components. It is the most substantial part of a bicycle and is usually made from steel, carbon fiber, titanium, or aluminum alloy. Recent environment-friendly models have incorporated wood or bamboo tubes as part of the frame.
The frame is composed of 2 subparts: the front and rear triangle. The front triangle is made up of the top tube, down tube, head tube, and seat tube, while the rear triangle contains the seat stay and chainstay. The top tube (crossbar) and down tube are the horizontal pipes that connect the head tube to the seat tube. The space between both parts is called the clearance, which provides the proper height for straddling. The down tube is also usually spaced, where a metal clip is typically attached to carry the cyclist’s water bottle which is usually called a cage. The seat tube joins the seat post on the top and the pedal mechanism on the bottom. The chainstay and seat stay connect the rear wheel hub to the pedal and seat, respectively.
Rust and Corrosion
If your bike frame is made of steel, one of the biggest obstacles you’ll face is rust. Rust forms on your bike’s tubes from constant exposure to moisture. To prevent corrosion, be sure to rinse your frame with water after every ride, particularly if you tend to sweat a lot while riding. The salt in sweat accumulates and tends to cause more corrosion. For extra protection, an easy fix is to use silicone rubber bathroom caulk that you can buy in your local hardware stores. Apply a little onto the base corners of the frame and wipe away the excess. It will prevent moisture from seeping into the inside of your tubes.
2Saddle and Seat Post
The saddle is the part where the cyclist sits. Most saddles have a hard-shell base covered with padding and a layer of leather or spandex. It bears most of the weight of the rider and aids in proper balance. The saddle is attached to the seat post, which controls the height of the seat. Seat posts are loosened and adjusted at the junction on the bike frame. There are different types of bicycle saddles, the most popular being the banana seat. Recently, seats specially designed for women were introduced into the market. These are characterized by having a full surface, a shorter nose, and a hole in the center area.
Proper Bike Fitting
The appropriate bike fitting is determined by the position of the pedals and concerning how tall the cyclist is. You can tell when the saddle is adjusted correctly if the cyclist’s legs bend slightly towards the pedal, without fully touching the ground. Another easy way to determine the proper height is to align the saddle with your pelvic bone. It promotes comfortable, even pedal strokes to prevent knee pain. This posture also helps keep your hips stable on the bike.
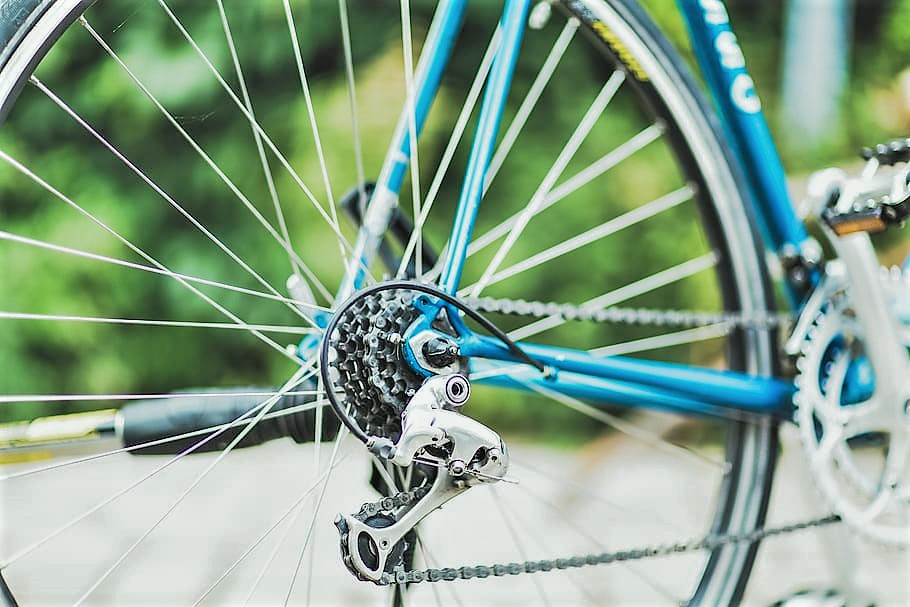
3Gears: Shifter and Derailleur
Typical bike gears are made up of two component parts. Both parts are used together to control the gearing mechanism of the bike. The shifter can be found attached to the down tube of the frame. It is a lever that changes gears via a Bowden cable connected to the derailleur.
A bicycle has two derailleurs, one in the front and another in the rear. The front derailleur holds the pedal, crank arm, chain, and chainrings. It is used to shift gears by moving the chain from one sprocket to another. The rear derailleur, on the other hand, is used to maintain tension in the chain. Both derailleurs work together as a mechanism to select the appropriate gear ratio when traveling on different terrains. The highest gear ratio makes the bike go faster and is used when riding on a flat road or downhill. The lowest gear ratio is easiest to pedal, making it comfortable to use when going uphill.
Stuck Shifter
The shifter is one of the parts of a bike that is handled often, making it prone to overuse. It is also common for grime and dirt to get wedged between the gears, causing them to get stuck. When your shifter is stuck, you are usually left in one gear ratio and unable to shift gears. Take out the cover to access the affected area and spray brake cleaner or any lubricating liquid to get your shifter back to working condition. This is a basic technique for bike repair and maintenance.
Gear Cable Tension
One of the reasons why you might not be able to change gears is because your cable tension might be too tight. This can easily be fixed by disconnecting the cable from the derailleur and pulling the cable manually until you feel it loosen, and the shifter is moving correctly. If you are satisfied with the tension, reattach the cable to the derailleur, making sure the barrel adjusters are screwed all the way in and the shifter is in the highest gear.
4Front Set: Handlebar, Head Tube, Fork
The front-most components control the steering of the bicycle. Much like the steering wheel of a car, handlebars are the primary steering control of a bike that allows you to turn left or right. It is attached to the head tube, which forms a junction for the fork. The handlebar is usually covered on both ends by padding to make for a comfortable grip while riding. Coverings can be made of any soft materials, and the most commonly used are polyurethane tape, plastic padded tape, cork tape, or leather wrap. Aside from steering, the handlebar is also used as a mounting place for bike accessories like bells, shift levers, a smartphone holder, GPS, and led lights.
Loose and Rotating Handlebars
You should always make it a routine to check your handlebars before every ride. Handlebars are your main steerers, and when not properly tightened, you could lose control of your bicycle. The best way to check if your handlebars are tight enough is to rock the wheel back and forth. If you hear a rattling sound or if the bars turn on their own, that means they are loose and need tightening. To do this, simply use a screw to tighten the center and headset bolts.
5Suspension System and Shock Absorber
The shock absorber controls the bike’s suspension. It is a bike mechanical device that is used to absorb impulses to limit the amount of shock felt in the bicycle during impact with the ground. It allows the wheels to tread properly through rough terrain without causing much vibration in the rest of the bike. Not all bicycles have a built-in shock absorber. But if you’re after better suspension and traction, attaching a shock absorber will significantly improve ride quality.
Lubricating Shock Absorbers
Maintenance of your mountain bike’s shock absorber should focus on one thing – proper lubrication. Shock absorbers are already equipped with their lubrication system in the form of oil pools inside the mechanism that prevents friction. To make sure your shock absorbers are providing good suspension, you should do two things: (1) maintain proper lubrication by preventing oil from leaking out, and (2) keep out dirt and grime to keep the oil pools clean. To do this, you need to regularly clean the external seals of your shock absorbers by removing dirt particles from the outside foam ring. After cleaning, apply oil to aid in lubrication.
6Brakes
Bicycle brakes perform the most vital function of slowing down or stopping a bicycle. Every bike has two brakes: one in the front located in the fork and another in the back near the derailleur. A typical brake has three components: the brake mechanism itself, the cable, and the lever. The system is simple – you control the brakes through the brake lever, which transmits a signal from your hand via the cable down to the brake itself. Learning to use your brakes properly will also help you adjust your speed, particularly when going downhill.
Stiff Brake Cables
To check if your cable is working correctly, firmly squeeze the brake lever. If the cable moves, that means you’re good to go. But if it doesn’t, chances are the cable could be stuck in its housing. The first step is to try increasing or decreasing the cable length through the barrel adjuster, which is usually located on the brake lever. If the cable still isn’t moving after adjustment, you should try lubricating the cable itself and the lever pivot. Rub a bit of bicycle lubricant or machine oil on each point.
7Wheels
Every bicycle has one wheelset, which is composed of two-wire wheels. Wheels carry the weight of the other bicycle parts and have a massive effect on speed and overall performance. Each wheel has five components: the rim, the hub, the spokes, the tire, and the valve. Before learning about bike repair and maintenance, we need to understand these five components of a wheelset.
The rim is the outer portion of the wheel to which the tire is attached and forms part of the brake system (it is the part where the primary brake mechanism is attached.) The hub is the heart of the wheel. It provides the bearings from which the wheel rotates. Both the front and back hub contain an axle, which is the main point of rotation. The spokes are the thin wire rods that provide the junction connecting the hub to the rim of the bicycle. A traditional wheel usually has 36 spokes—the length and diameter of the spokes depend on the size of your frame and wheel rim. Most spokes are made with steel wire, though some cheaper bikes use galvanized or chrome-plated spokes.
The tires of a bike are usually made from cotton and steel fibers and covered in rubber. Tires carry most of the impact of riding and are essential aspects of a bike’s suspension and balance. They are mounted on the rim to form part of the wheelset. A right tire must be stiff enough to support the weight of its rider, as well as soft to absorb the force of impact. Pneumatic tires provide stiffness through pressurized air in the inner tube. This air is sealed in by a small valve, which prevents air from escaping.
Wheel Maintenance – Clean Bearings
Because the wheel is the only touchpoint to the ground, it is the dirtiest part of your bicycle. Regular cleaning should be done after every ride. When cleaning your wheels, be sure to use a damp rag to wipe off the dirt and grime. Never use a water hose – the pressure is too intense and could damage or dent the spokes and bearings. This is another tip of basic dirt bike maintenance.
Tips for a Quick Bike Repairs: Simple Solutions to Common Bicycle Problems
After you’ve familiarized yourself with the basics, you can begin to repair your bicycle with these in-a-pinch tricks:
1Chain Break
The most common cause of chain break is forceful peddling while shifting the front gear. To repair this, you’ll need to remove the broken chain segments. You can do this with a chain breaker tool that you can buy from any bike shop. If none is available, then you can just use a hammer and screw. Proceed to push the pin to remove the damaged chain. Discard the damaged chain. After removing the broken part, thread the chain back through the derailleur and reattach the pin. Double-check if the pin is tightly attached by pulling on the chain.
2Flat Tire
A cyclist’s number one rule: always, ALWAYS bring a portable tire pump wherever you go. Nothing ruins a good bike ride like a flat tire. Also, low air pressure could cause permanent damage to the wheel rim. You can tell if your tire is properly inflated by pinching the sides – we call this the “pinch test.” It should be firm to the touch. Your body weight also plays an important role in the amount of air pressure on your tire. If you are heavier, the air pressure should be in the higher range. Remember to choose a tire pump with a built-in pressure gauge, so it’s easier to inflate.
3Tire Punctures
If your tire is still sagging even after you’ve inflated it, you’re dealing with a puncture and have to change your tire. Start by releasing the remaining air on the tire by opening the valve. Push your thumbs into the edge of the tire and pop it out of the rim. The next step is to remove the inner tube, taking caution not to hit the tire valve. Get your replacement tube and place a little air until it begins to take shape, but don’t inflate it all the way. Repeat the process with your thumbs by reattaching the tire back to the rim. Double-check if the valve is securely closed and you’re good to go!
4Squeaky hubs and pedals
Hubs and pedals tend to make irritating grinding sounds from time to time. The solution for bike repair? A few drops of machine grease will do the trick. Remember that these parts take on the most friction and should be lubricated regularly.
5Chipped Paint
In the case of chipped paint, you can use lacquer thinner to remove oil. Do not use sandpaper because it might cause more scratches. After applying the thinner, cover the chipped part with any paint that matches your bike’s original color. Aside from looking good, adding a new layer of paint will also help prevent rust and corrosion.
6Cracks and Dents
Because your bike frame is the core component of a bicycle, it absorbs most of the shock from impact. It causes dents and cracks on the tubes. Dents are not much of a problem, as these are usually just aesthetic problems and have no effect on how well your bike operates. When it comes to cracks, your best bet is to weld a piece of steel that is slightly bigger in diameter than the crack. Make sure to repaint the attached part so your bicycle will look good as new. However, take caution. Welding is only a temporary bike repair solution, particularly in aluminum frames. If the crack is too big, it might be time to change the entire bike frame.
7Loose Saddle Seat
If your saddle seat moves back and forth while biking, the fitting on the stem might be loose. To tighten it, use pliers or an adjustable wrench to adjust the nut on the lower right side of the stem directly below the seat. It controls the horizontal alignment of the saddle. A properly adjusted seat should not be straight: it must be tilted slightly towards the back. Once you’re comfortable with the adjustment, remember always to tighten the seat firmly to prevent wobbling.
8Worn Out Handlebars
The handlebar is usually covered on both ends by padding to make for a comfortable grip while riding. However, these coverings can get old and worn from overuse, making it difficult for you to grip your bike properly. This can be repaired by rewrapping your handlebars with new tape. If your bicycle did not come with an extra set of handlebar tape, you could buy padded tape or leather wrap from bike shops or hardware. Start wrapping from top to bottom, starting from the outermost ends of the bars. Make sure to overlap while wrapping, so there are no spaces in between for a clean finish.
10 Essential Bicycle Tools
Maintaining and repairing your bicycle doesn’t require a lot of tools, but you’ll have to choose the right ones. Here are the ones you need to keep in your toolbox for a bicycle tune-up:
1Screwdrivers
You’ll need to have at least two types of screwdrivers: a flat blade and a crosshead. If you have the budget, it’s best to invest in a complete set of screwdrivers that comes in different shapes and sizes. These come in handy when tightening your bike’s cogs and bolts.
2Wrench Set
Your wrench set should contain open-end wrenches that are between 2 to 12mm in size. These are essential when repairing and maintaining your brakes, particularly hydraulic disc brakes.
3Needle Nose Pliers
This versatile tool can be used to bend and cut wiring. Its long nose allows it to reach tighter, smaller places on your bike which is very essential for bike tune-up.
4Hexagon or Allen Keys
This L-shaped multi-tool allows the needed leverage for all kinds of bike repair and maintenance. It is a lighter alternative to wrenches and lightweight for longer usage.
5Cable Puller
This is the go-to tool for bike repair and maintenance with hydraulic brakes. It helps you pull the cables for a tighter fitting, making it easier to adjust your bike’s tension in the brake and gear.
6Portable Tire Pump with Built-in Pressure Gauge
This pump should be attached to the rear tube of your bike frame, so you’re prepared to repair a flat tire anytime, anywhere.
7Chain Tool
Chain breaks are one of the most common problems that cyclists face. If you’re going to remove and reattach busted chains, this is your best option for a fast and clean change.
8Cable Cutter
When cutting cables, using pliers or other tools will do more damage than good. This is where your cable cutter comes in – it gives you a clean cut while still keeping the inner cable strands together.
9Tire Lever
When changing tires, you need to remove the tire from the wheel rim. Using your hands could be dangerous, so you’ll need a tire lever to help detach the tire. This tool provides the proper leverage to pry the tube from the rim without damaging the tire.
10Bike Stand
Unlike the others on this list, a bike stand cannot fit into your toolbox, but it is essential nonetheless. It helps keep your bike steady and away from the ground as you do your repairs. More than just convenience, it helps protect your bike from scratches resulting from constant contact with the floor when flipped over. There are a lot of cheap metal stands in bike shops, but you can also make your own bike repair and maintenance using old wood you might have to lie around.
Basic Lubrication Tips
Your bicycle may look simple but is still a machine. And like any machine, bike mechanics such as gears need regular and proper lubrication to run smoothly. Here are a few tips on how you can keep your bike adequately greased for optimal performance:
- Use mineral-based lubricant oil because it is designed specifically for bicycles. Never use household spray lubricants or motor oil.
- Lubricant should be applied to the parts that take on the most friction. These include chain, brake, derailleur cables, shifter levers, hubs, and pedals.
- Always clean and dry the surface thoroughly before lubricating. To clean, you can use hot water with soap or dishwashing liquid.
- Do not over-lubricate! Apply only one or two drops onto each part.
- Regularly lubricate your bicycle at least twice a month. But if you use your bike daily, you’ll need to apply oil more often.
- Apply lubricant every time your gears make a squeaking sound. This means the joints are dry and should be oiled to prevent rust and corrosion.
- Apply oil to each part separately. Allow a few minutes for one part to absorb the oil before moving to another.
- Excess oil should be wiped away with a dry rag to prevent dirt from sticking to your bike.
Conclusion
These easy tips provide an economical and straightforward solution to make your bike last longer. With these D.I.Y. bike repairs and maintenance, you’ll never have to worry about getting stuck on the road with a flat tire or broken chain. Learning to do your bike repair and maintenance will help you keep your bicycle in optimal condition – without having to spend hundreds of dollars by going to the mechanic. Armed with just your bike and your toolbox, you can even do your bike maintenance at home. After that, you’re ready to hit the road!